Wednesday, April 9, 2008

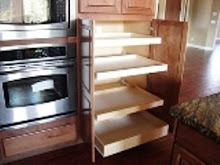
Installing Pull Out Shelves


Installing Kitchen and Bath
Pull out Shelves


Installation instructions for
Pullout shelves

Use the pull out shelf


The #1 tip on installing our
pull out shelving is to
let the roll out shelf be your guide for adjusting the drawer glides.
There are points in every method of installation that will be easiest to
accomplish when you use the roll out shelf as your guide. The drawer
glides that we use have a control side and a free side. The right side
glides are the control side, the track that the wheel rolls in is a
captive side. The metal is bent around the wheel and the wheel will only
track in that groove. The left side glide is the free side that allows
for adjustment of the assembly. It is very important to
pay attention to the left side glide for any problems with glide
alignment with your slide out shelves will show up on the left side.


Existing Shelf


If you are mounting to an existing shelf you should
check to make sure it is held securely in place. When the slide out
shelf is extended, all of the weight will be on the front of the
existing shelf, and if the shelf is not supported with strong clips,
there is a possibility the existing shelf could beak down. Metal
clips in both 5 mm (about 3/16") and 1/4" are available on our

hardware page.
It is also important to make sure the back of your shelf is secured down
or else it will tip when the sliding shelf is extended. We usually
secure the back of the shelf by installing a screw on each side of the
shelf either to the back wall or the back of the side walls. We leave
the head of the screw sticking out 1/4" or more just on top of the
adjustable shelf so that the extended head keeps the shelf from tipping.
Make sure you do not put the screw through an exposed wall or cabinet
back. Or you can secure the adjustable shelf in the back with a 1/4
piece of plywood cut 1" wide.


Full Shelf installation
(click on thumbnails for larger pictures)


The simplest installation method is when
mounting the slide out shelf to the cabinet base or an existing full depth
shelf. If you order your slide out shelf with the full shelf mounting the
drawer slides will come with
two L brackets

attached on each side.
Set the glides in place in your cabinet with the wheels facing towards
the front, the glides are marked CR and CL


Then
set your slide out shelf with the front tipped up slightly in place by lifting the wheels
at the rear of the shelf over the wheels on the front of the cabinet
glides. Slide the shelf slowly all the way inside the cabinet. If the left side glide
comes out of place you can slip it back into position without removing
the shelf. Align the shelf in the cabinet and make sure the front of the
CL and CR glides are lined up with the front of the existing or base
shelf. Put a slight
downward pressure on the shelf and extend it far enough to expose the
rear brackets.


Install a screw in the right to left slotted hole closest
to the slide member and tighten. You can now close the shelf again and
re-check your alignment. Repeat the process for the other side and then
again for the front of the glides. If the glides move while installing
you can simply close the shelf and re-align them. When you have one
screw in each bracket you can open and close the shelf a few times and
check the adjustment looking at the left side glide and paying attention
to the front alignment. There should be
about 1/16" to 1/8" of play in the glides. If the glide is too tight or
too loose simply loosen the screw in one of the brackets (front or rear
whichever needs adjustment) and move the bracket the correct direction
and tighten. Remember to pay careful attention to the left side glide if
the gap is too large in the rear the shelf will roll great but as soon
as you add weight you will get a bump when you slide it out. If the
shelf is tight, you can tell which rear bracket needs to be moved
outward by tapping on the front of the slide out shelf, which either
side has movement, the opposite rear bracket is the one to move outward. After you
have the shelf adjusted


correctly you need to add a second screw in each
bracket using the center hole to lock the slide in place.


Half Shelve


The second method of installing slide out shelves is
mounting to a half depth shelf in the back of the cabinet. You will need
a small level, with a magnetic strip on one side. Check
the existing shelf to make sure it is secure and can not lift up. The glides for
the half shelf installation will have one
metal "L" shaped bracket on each glide mounted toward the rear. The end with the
wheels faces forward. If you have 4 "L" brackets , the


front ones will not be needed . Set the rear
bracket on the existing shelf
and place the front edge of the glide against the cabinet face frame,
about midway. Place
your level on the glide and level it. When you have the glide level, mark
the location of the front hole in the glide. Repeat this step for the
glide on the other side face frame. It is
best to drill a small pilot hole to prevent splitting, before screwing
the glide in place. After you have the front of the glides attached you
can set the shelf in place by placing the wheels on the rear of the
shelf glides over the wheels on the front of the cabinet glides. Insert the shelf all the way
into the cabinet and align the shelf to be square with the cabinet
front. If there is too much space between the cabinet face frames you
will need to insert spacers or washers to build out. You can
order spacers from us in various sizes.
Check the alignment of the left side glide and when it is properly
aligned press down slightly on the shelf and extend it far enough to see
the rear bracket. Place a screw in the left to right slotted hole
closest to the glide and tighten moderately. Reinsert the shelf and
check glide alignment. When alignment is correct repeat the process of
extending the shelf and insert a screw in the other side's bracket.
Again insert the shelf and adjust as needed. When everything is aligned
extend the shelf again and place a screw in the center hole of each
bracket to lock it in place. Note: When using Full Extension slides:
The full extension glides do not have a hole in the front of the
cabinet glide. To use a full extension glide in the middle of the
cabinet, it is usually easiest to side mount by using a 1x4 inch
of wood mounted to the sidewalls at the height of the desired shelf
placement


Rear Sockets


Note: Rear
Sockets can not be used with full extension glides


Rear mount sockets are for mounting shelves where
there is no existing shelf to mount to. The first step is to determine
the height that you want the slide out shelf. Make a mark on both cabinet face
frames for the bottom of the shelf. Insert the cabinet glides partially
into the plastic sockets (you must have specified rear extension mounting
when ordering) note the brackets are marked CR and CL. With a screw, attach the front end of the glides (the end with the wheels) to the
cabinet face frame where you marked. You will need to push the glide
slightly against the back wall of the cabinet to get the rear socket seated
to the correct depth (make sure to push back tight enough that the
friction will help to keep the glides in place. Install the shelf by
sliding the rear end of the
shelf glides (the end with the wheels) over the wheels on the front of
the cabinet glides. Slowly slide the shelf in completely and align it to be
square with the front of the cabinet.


Using a level, make sure
that the vertical of the slide out shelf is level. Make a pencil mark in
the upper small hole of the rear extension. Repeat this process
for the other side. Now you can remove the shelf and insert a
screw through the rear socket and into the back of the cabinet at the
marks you just made. Now, reinstall the slide out shelf and check for
adjustment. Once you have the shelf adjusted, install at least one more
screw in each socket. If you are having trouble getting the shelf to
slide smoothly make sure the glides are parallel to each other and not
twisted.


Side Mount


Another option for mounting slide out shelves in cabinets that
do not have an existing shelf is side mounting. You can purchase

spacers
from our store to build up the
space or you can attach a 1x4 board the full depth of the cabinet so you can mount to the cabinet side walls. A
good alternative in
pantries is to install vertical strips of wood on both sides (two on
each side, one near the front and the other near the back) that provide
the proper filling to match the space behind the cabinet face frame and
the inside of the sidewall. A side mount installation can be the
strongest and most space efficient installation. It is best to use a
piece of wood the same thickness as the space behind the face frame that
runs from the bottom of the cabinet to above the height that you want
the shelf installed. You may need to double up the wood to get the right
size. You can glue and screw this wood in place to make a secure
attachment. After the wood is installed you can install the glides at
the proper heights and put the shelves in place. Due to the fact that
cabinets are often out of square it may be necessary to use spacers or
washers to take care of any wide spots.


Important note


Make sure to read all of the instructions on this
page. These instructions are meant to be a guide only and they can not
cover every possible installation. Slide out shelves are fairly easy to
install for the average homeowner and can take as little as five minutes
or less to install. It is important that you be able to determine the
soundness of your installation. If you are not comfortable with your
ability to determine the quality of your installation you should seek
advice and possibly hire someone else to review the job or do the
installation for you.


Monday, April 7, 2008

Welcome to Everything About Pull Out Shelves

I am starting this post to help with questions and problems that arise about pull out shelves. Kitchen pull out shelves and trays will make your life easier but can also be frustrating when it comes to measuring and installing pull out shelves.

Even though we custom make pull out shelves and sell to the general public at wholesale pricing, I also understand that some want the satisfaction of producing pull out shelves themselves. So, if you have any questions about making pull out shelves yourself, please do not hesitate to ask.

I will start with how we make pull out shelves and a few thoughts on why we make roll-outs the way that we do, rather than other methods.

Our Pull out Shelves are made from 9 ply baltic birch. The reason that we use this ply is the strength. The birch from the baltics has small voids and is a very stable board that resists twisting and warping. This board has been very popular by cabinet makers, skateboard and surfboard makers for years because of this quality.

Our pull out shelves are produced using rabbet joints that help to inter-lock the front and back into the sides. The sidewalls of our pull out shelves are glued and pneumatically nailed into the front and back walls. This method gives us a very strong joint.

Dovetail joints- we do not dovetail our joints, there are company's selling dovetail jointed pull out shelves, but be aware that they are half blind dovetails and not full dovetail joints. A dove tail joint has great strength front to back, but lacks strength side to side. Since most of our customers are ordering pull out shelves for cabinets that have pots and pans rather than undergarments, we feel that a rabbet joint is the ideal joint to use on our pull out shelves.

Butt joint- a butt joint is not as strong as either a rabbet or dovetail joint. You will find butt jointed pull out shelves where manufacturers are reducing labor costs to increase profits. Another thing that is common among butt jointed pull out shelves is that they will almost always have the shelf bottom surface mounted and stapled to the sidewalls of the pull out shelf rather than capturing the bottom in a dadoe slot. This again is to save labor costs and raises a red flag.

If you have any questions or comments about pull out shelves please post your question and we will try to answer the best that we can.

You can also get more information about our pull out shelves at our web site, http://www.slideoutshelvesllc.com